
Elevate the elegance of your Christmas tree this holiday season by mastering the art of creating stunning bows. In this guide, we’ll show you “how to make a bow for a Christmas tree” in a few easy steps, adding a touch of handmade charm to Christmas decorating ideas.
Contents
- 1 The Importance of a Well-Crafted Christmas Tree Bow
- 2 How to Make a Bow for Xmas Tree – Choosing the Right Materials
- 3 Preparing the Ribbon to Make a Christmas Bow for Christmas tree
- 4 Crafting a Classic Bow
- 5 How to Make a Bow for Xmas Tree – Tips and Tricks
- 6 Adding Bows to Your Christmas Tree
- 7 Creative Uses of Christmas Tree Bow
- 8 Conclusion
The Importance of a Well-Crafted Christmas Tree Bow
As the holiday season approaches, decking the halls becomes a cherished tradition. When it comes to your Christmas tree, the centerpiece of your festive decor, there’s one element that can elevate its elegance and charm: the Christmas tree bow.
A well-crafted bow is not just an accessory; it’s a symbol of the season’s spirit and joy. In this guide, we’ll show you how to make a bow for a Christmas tree, from selecting the right materials to crafting different styles and adding them to your tree and beyond.
How to Make a Bow for Xmas Tree – Choosing the Right Materials
Before learning how to make a bow for a Christmas tree, let’s gather what you need. Here’s a list of materials required for crafting a Christmas tree bow:
- Quality Ribbon: The foundation of your bow, the ribbon should be durable and available in various colors and textures.
- Scissors: A sharp pair of scissors is essential for clean and precise cuts.
- Floral Wire: This will help secure the center of your bow.
- Wire Cutters: For snipping the floral wire.
- Tape Measure or Ruler: To ensure accurate measurements.
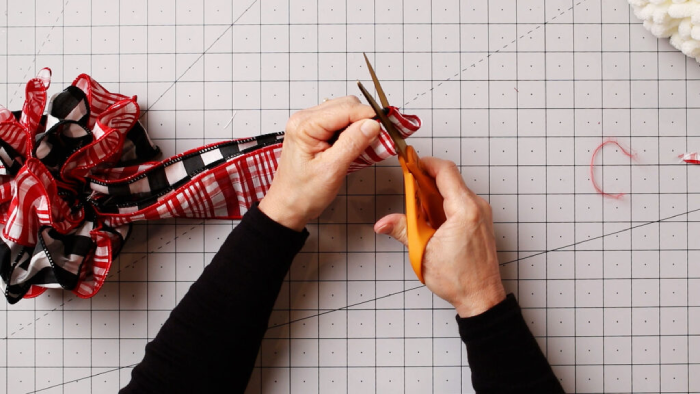
Preparing the Ribbon to Make a Christmas Bow for Christmas tree
Once you have your materials in hand, it’s time to prepare the ribbon for your Christmas tree bow. Follow these steps of how to make a bow for a christmas tree process:

- Measure and Cut: Determine the desired length of your bow’s tails and streamers. Use a tape measure or ruler for accuracy and cut the ribbon accordingly.
- Create Tails: To create the tails, fold the ribbon in half lengthwise, allowing it to hang down like the tails of a kite. Ensure that both ends are even.
- Form Loops: For the bow itself, form loops by folding the ribbon back and forth, creating a fan-like structure with as many loops as you desire.
Crafting a Classic Bow
Creating a classic Christmas tree bow is like weaving a tapestry of tradition and elegance. Each step, from forming the loops to securing the center and meticulously fluffing the bow, is a labor of love.
As you adjust and finesse each loop, you’re sculpting a masterpiece that will grace your tree. Whether it’s your first attempt or the latest in a long line of how to make a bow for a Christmas tree, the process is a rewarding journey filled with creativity and craftsmanship. It’s in the details and the symmetry of the loops that the magic of a well-crafted Christmas tree bow truly comes to life.
How to Make a Bow for Christmas Tree – Step-by-Step Instructions
Now, let’s dive into the heart of how to make a bow for a Christmas tree with a step-by-step guide to creating a classic Christmas tree bow:
- Forming the Loops: Begin with the tails you’ve prepared, ensuring they hang down symmetrically. Take your ribbon and create a loop by folding it over itself, allowing the tail ends to drape down. Secure the center of this loop with floral wire. This loop will be the center of your bow.
- Securing the Center: Continue creating loops, alternating sides, and stacking them on top of one another, securing each layer with wire. As you stack, make sure the loops on both sides are roughly symmetrical in size.
- Fluffing the Bow: Once all the loops are secure, fluff and adjust them to create a pleasing shape. Ensure that the tails hang elegantly below the bow.
Include Images or Diagrams for Clarity
For those seeking to learn “how to make a bow for a Christmas tree,” the power of visual aids cannot be overstated. High-quality images or instructive diagrams can play a pivotal role in enhancing the understanding of the bow-crafting process.
They serve as a visual compass, guiding readers through each step with precision. From measuring and cutting the ribbon to creating loops and securing the center, these photographs provide a visual roadmap, making it easier to grasp the art of bow-making.
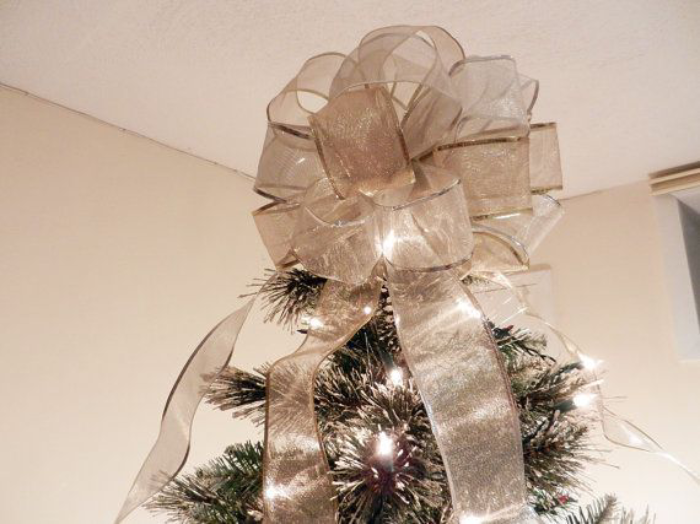
Variations and Styles
There are some trending ideas for your process of how to make a bow for a Christmas tree:
- If you’re looking for a more intricate and eye-catching style, consider creating layered bows. Layered bows involve crafting multiple bows of varying sizes and stacking them on top of one another. This technique adds dimension and texture to your tree.
- Looped bows are all about creating an abundance of loops to achieve a lush and luxurious look.
- For a themed tree, select ribbon patterns and colors that align with your chosen theme. Rustic themes may call for burlap and plaid, while elegant themes may use metallic and satin ribbons.
How to Make a Bow for Xmas Tree – Tips and Tricks
Adding an elegant bow to your Christmas tree is a timeless tradition, and perfecting this skill can enhance your holiday decor. In this guide, we’ll delve into the art of crafting the ideal bow for your tree, providing expert tips and tricks to help you master the technique.
- Tips for a perfect Christmas tree bow: If your initial attempts at making a bow for your Christmas tree don’t turn out flawless, don’t be disheartened. Achieving mastery in the art of bow-making requires time and experimentation. Try using ribbons of different widths and textures to discover the style that best complements your tree.
- Avoiding Common Mistakes: Try to not add too many loops to your bow, as this can make it look messy and unstructured.Ensure that your loops are of a consistent size, creating a balanced and appealing bow.
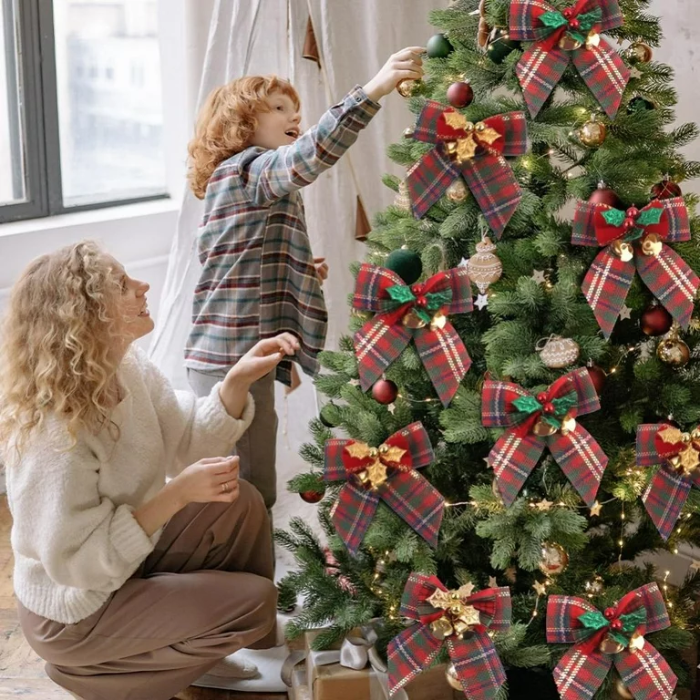
Adding Bows to Your Christmas Tree
Where you place your bows on the tree can have a significant impact on its overall appearance. Here are some tips for the best placements:
- Space them evenly throughout the tree, ensuring a balanced distribution.
- Attach them to the branches close to the trunk for added depth and dimension.
- Use floral wire or ornament hooks to secure the bows firmly to the tree.
Moreover, when incorporating bows into your tree’s decor, consider the overall theme and color scheme, put some personalized gifts around it. Ensure that the bows harmonize with other ornaments, garlands, and lights for a cohesive and polished look, or you can try to learn how to make a xmas tree, which fits with your handmade Christmas tree bow.
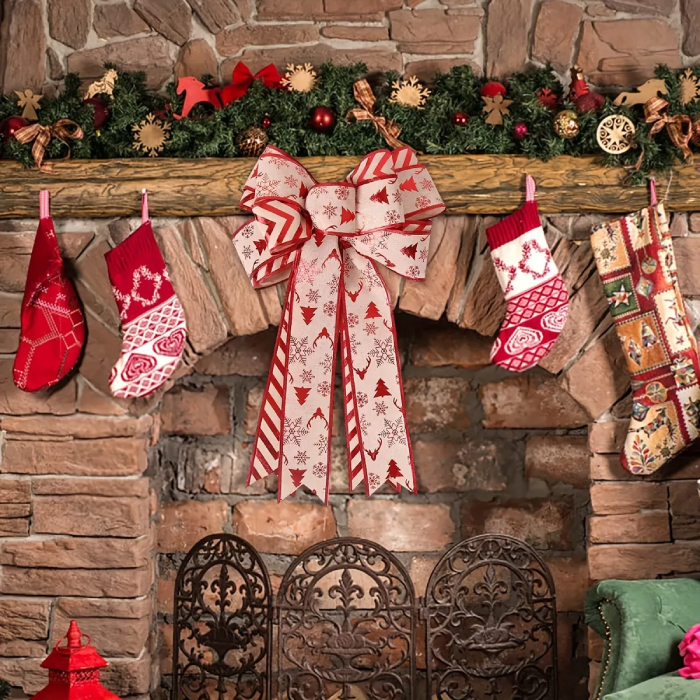
Creative Uses of Christmas Tree Bow
The beauty of a handmade Christmas tree bow lies in its versatility. Beyond adorning your tree, consider these creative uses:
- Gift Wrapping: Elevate your gift-giving by adding bows to trending Christmas presents.
- Wreaths: Decorate wreaths with bows to create a welcoming entryway or wall decor.
- Table Centerpieces: Place bows on your holiday table centerpieces for an elegant touch.
Bows as an Essential Part of Gift Presentation, Wreath. Therefore, don’t be afraid to include instructions on how to create a bow for a Christmas tree into your present wrapping, wreath-making, and other holiday craft projects as you experiment with their many potential applications. Your exquisite bows can serve as a connecting thread for all of your Christmas trimmings.

Conclusion
In conclusion, mastering the art of learning how to make a bow for a christmas tree adds a touch of elegance and tradition to your holiday decor. The satisfaction of creating a perfect bow, tailored to your style and theme, is a joy that lingers long after the holiday season. As you embark on this creative journey, remember that practice and patience are your allies.
We’d love to see your Christmas tree bows! Share your creations, experiences, and tips with us. Join the community of holiday enthusiasts and let your unique style shine in your festive decor.